Showing posts with label sewing. Show all posts
Showing posts with label sewing. Show all posts
Tablecloth to shower curtain!
What would you do with this

 his is one of the easiest sewing projects I have ever done. I would call myself a lazy sewer, I especially hate hems and finish detail. (in fact I have been known to be so excited about a project, I leave these minor details undone...please don't pull up the bottom of ANY of my curtains:) Anyway, I found this tablecloth at World Market (they were 30% off) and thought the teal in the fabric design went perfectly in my teal bathroom. Forgive me that i did not take pictures of this process. But it is really simple.
Set aside about 30 minutes. REALLY, it is SO easy.
A.) Most shower curtains are 72" square. The table cloth that I chose was 60"X90".
B) to make up for the 90" width, I added Pinch Pleats to the top for a little detail. Just spaced where I wanted the 12 rings and pinched. If I was off by an inch or two you really can't tell. (90"-18"=72"(each pinch was 1.5))
C) Add the 12" runner to the bottom (60" +12"=72" length it s already 90" long) COMPLETELY finished detail, it adds some weight to the bottom because it is double backed so the curtain hangs really well.
D) Add button holes along the top for the rings, or you could do the clips an even easier option
E) VOILA, hang your curtain.
World Market and many other stores have great designs for their tablecloths and runners...the possibilities are endless!
I hope enjoy this project as much as I did!

 |
| Tree of Life table Runner from World Market |
and this
 |
| Tree of Life Table Cloth from World Market. A SHOWER CURTAIN OF COURSE!!!! |

 |
| Bottom Detail |
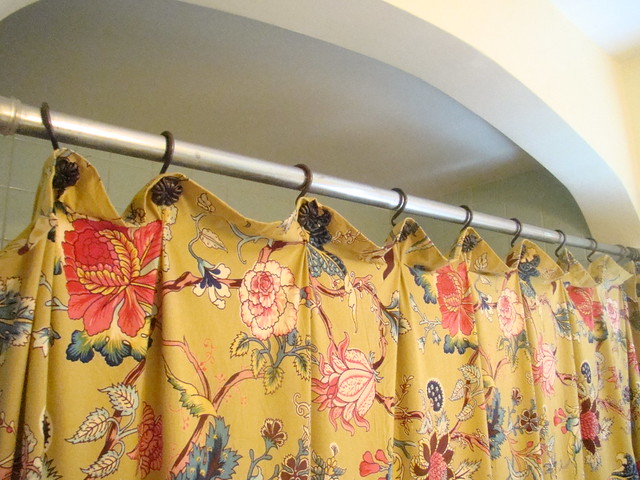 |
| Top Pleated Detail |
his is one of the easiest sewing projects I have ever done. I would call myself a lazy sewer, I especially hate hems and finish detail. (in fact I have been known to be so excited about a project, I leave these minor details undone...please don't pull up the bottom of ANY of my curtains:) Anyway, I found this tablecloth at World Market (they were 30% off) and thought the teal in the fabric design went perfectly in my teal bathroom. Forgive me that i did not take pictures of this process. But it is really simple.Set aside about 30 minutes. REALLY, it is SO easy.
A.) Most shower curtains are 72" square. The table cloth that I chose was 60"X90".
B) to make up for the 90" width, I added Pinch Pleats to the top for a little detail. Just spaced where I wanted the 12 rings and pinched. If I was off by an inch or two you really can't tell. (90"-18"=72"(each pinch was 1.5))
C) Add the 12" runner to the bottom (60" +12"=72" length it s already 90" long) COMPLETELY finished detail, it adds some weight to the bottom because it is double backed so the curtain hangs really well.
D) Add button holes along the top for the rings, or you could do the clips an even easier option
E) VOILA, hang your curtain.
World Market and many other stores have great designs for their tablecloths and runners...the possibilities are endless!
I hope enjoy this project as much as I did!

Sew HOT!

 |
| Made from Dupioni Silk and Lawn Bias Tape that I had for a top that was never made. |
 |
| The Back is a sample swatch from Robert Allan. |
 |
| My signature, I never quite finish anything. Mommy duty called, but it still looks nice. |
 t is so HOT here that going outside is miserable! I thought I would have a sew day...or couple hours yesterday. Since it is HOT, the children are inside, so my productivity level isn't exactly steller, but it made me happy, and it was just the punch of color my living room needed. As my daughter said. "Mommy does that pillow stand for Ophganorse":) Why, honey, yes it does!
Feeling very inspired by this room.

Photographed for the cover of House Beautiful May 2010 issue.
Have a great, and hopefully not as hot as it is here day!
Silhouette Pillow....how to.
 |
| My Silhoutte Pillow |
I have had this idea in my head for a while...and finally just decided to do get it done. With minimal sewing and cutting skills, even the most novice sewer can accomplish it.

Materials:
A pillow form
A piece of burlap
A piece of drop cloth (I have a lot of scraps from various projects)
Rick-rack (ribbon, or cording would work as well)
Colored Felt
Scissors
Needle
Thread
A printed out Silhouette of your choice aproximate size 5 X 7 (would keep it a fairly simple silhouette)
(You can find them online, or if you have a good one of a family member it would be much more personal)

Step one
pin the silhouette to the felt

Step 2
Cut out the silhouette
 |
| Don't worry I ironed the burlap after I snapped the pic:) |
Center the Silhouette on burlap (I used a temporary spray adhesive, but you can pin it as well.)
 |
| sorry for the blurry pic, you can kind of see the image |
 |
| Close up of what the stitch should look like. |
Tack the silhouette down with a simple in and out stitch (I don't know the official term for this stitch) But I just went in and out where the long stitch is on the other side of the fabric.
Step 6
Now just sew the pillow like you normally would. I didn't take pictures of this process, but if you need to know how to sew a pillow, there are a TON of great tutorials online.
There are so many ways you could customize this pillow...with ruffle trim, with a colored or geometric fabric on the back, with flange, etc, etc.
Happy Hump Day!

Subscribe to:
Posts (Atom)


